Wednesday, August 18, 2010
Field Day in Washington, Aug 25, 2010
It's been a while since we've had a post here but I wanted to let folks know about a field day up in Washington that's being put on by Snohomish County Extension - "From Field to Feed, Flour and Fermentation." Looks like a great event and you can find out more by going to Brown Paper Tickets.

Wednesday, December 23, 2009
Park Wheat
I am honoured to be able to post on this blog. I can see that it may develop into a useful source of information for the growing number of smallholders who wish to venture into successful grain and pulse production on a small scale.

First I guess I should introduce myself. My name is John Schneider. I have been farming most of my life and family generations as far back as we can trace have also been farmers. It has been in the last 10 years or so that I have been focused on organic grain production; heritage breeds of grains and livestock have been my further interest for the past 3 or 4 years. We farm in central Alberta, Canada very near the city of Edmonton.
I thought for my first post I would share with you a little info. on the main grain variety that we currently produce. It is called Park Wheat. It was developed here in Alberta at the Lacombe Research Station back in the 60's. It is far from an ancient grain, but it is what I would call a heritage variety. It is an open pollinated Hard Red Spring that was initially bred to resist rust.
Aside from its resistance to various diseases I have found that it is a very early spring variety and seems to be fairly drought resistant. It is also very high in protein and we have had it range anywhere from 13.5% to 14.5% protein. The falling numbers have varied a little more but generally have been in the 330-350 range. It is a very suitable baking wheat with good dark colouring and a moderately rich taste. Not as dark and rich as something like Marquis or Red Fife, but still pretty good.
Monday, December 7, 2009
Corn Harvest
 |
| Painted Mountain Corn - From skyline |
We grew three varieties of corn up at Skyline Farm, just outside of Portland, OR, this year: Painted Mountain, Robust 128YH popcorn, and Nothstein dent. These were very experimental for us and we're learning a lot through the process, which I thought I'd share a little of with all of you.
All of the varieties were grown without supplemental irrigation of any sort. They were seeded to moisture the week of May 4 and didn't see much more than a couple of inches or so of rain for the remainder of the season, most of that coming in small drizzles, just heavy enough to germinate some weeds. Mostly we used 36" row spacing and thinned to about 12-18" between plants after direct seeding with an Earthway seeder. We grew less than a quarter acre total in corn.
For one section of popcorn we did a three sisters planting and the row spacing was 108". We seeded five different varieties of pole beans for dry bean harvest three weeks later, right along side the germinated corn rows. Three to four weeks after seeding the corn we direct seeded hills of winter squash (10 varieties) half way between the corn rows. This planting had the best looking corn plants and seemed to yield similarly per row, if not a little better (this is only based on how many bins per row we were filling when we harvested). I was skeptical about this planting scheme but I have to say the plants all looked great. More on those plantings, along with photos, are over at the Slow Hand Farm blog. Gophers got many of the beans in the end but the squash yielded impressively and the corn looked healthier than the corn which was planted alone in a block (same variety).
 |
| Robust 128YH at harvest - From skyline |
We weren't particularly well set up for drying corn. Most of the corn we harvested with the husks on, but we switched to husking in the field and this was definitely better, mostly just in how much space it took up and how easy it was to move. The Painted Mountain was dry very early in the season, in late August/early September, but we didn't have time to pull it out of the field until the week of September 21. Balancing how dry the corn was in the field, and the coming rain, we chose to harvest all of the corn the week of the 21st and 28th, with the popcorn being the last to come in. We piled the cobs in shallow fruit bins, 48" square and about 12" deep. These stayed in a covered area for a few weeks until it started to get cold and damp and then we brought them in the barn with the front loader forks.
We did experience some molding in the bins, as there wasn't enough air flow really and we should have had fans circulating air earlier than we did. The humidity here is quite high and it's really difficult to get the moisture down.
 |
| The Sheller - From skyline |
 |
| Video of the sheller (with bins in the background) - From skyline |
Fortunately one of the crew had an antique sheller sitting around and he was kind enough to bring it up to the farm. We shelled all of the corn in November in our spare time (actually there's still a little popcorn left). The dent corn was easiest, with big fat kernels, the narrow cobs of the popcorn went through the sheller without taking all of the kernels off on the first pass so we still need to run them through a second time. I have a VacAway seed cleaner, which cleaned most of the remaining silks, broken kernels, and pieces of cob from the good kernels.
 |
| (l to r) Painted Mountain, Robust 128YH, Nothsteins Dent - From skyline |
 |
| (l to r) Painted Mountain, Robust 128YH, Nothsteins Dent - From skyline |
I've ground a bit of the Painted Mountain and Nothstiens, by hand, to sample the two. I hope to get more done on an electric mill soon. The yield on the Painted Mountain was about 2300 pounds/acre of grain (38 bushels?). The Nothsteins yielded about 3500 pounds/acre (58 bushels?). Trying to remember back, and estimate, I'd guess it's costing us around $1/lb to produce the grain, plus whatever it ends up costing to mill it. This of course is a very rough estimate and it depends on the yield, although more of the cost, as I estimate it, is actually post harvest rather than in the field.
I'll try to give an update when we're all done milling, tasting, etc.
Saturday, October 3, 2009
Dry Bean Trial
 |
| From Seed Cleaning Equipment |
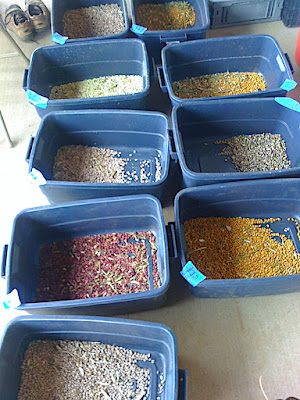
Up on Skyline, in the West hills of Portland, we trialed 12 bush beans for dry bean production this year. They were all grown dry land style, no supplemental irrigation in an area where there is no summer rain (unfortunately there is usually a small rain, or two, just as the pods are drying). We grew all of the varieties one in direct seeded rows 3 feet apart. The beans were hand hoed several times during the season and required little if any hand weeding in the rows. When the majority of the pods were dry we clipped plants and stored them on remay on a gravel floor of a pole barn for about a month. Last week we threshed and winnowed all of the varieties and took initial yield weights. They still need some finial cleaning but the majority of work is done.
 |
| From Seed Cleaning Equipment |
To thresh the beans we ran them through a Roto Hoe chipper shredder with fixed blades. Some of the varieties needed to have the motor run slow to limit splitting, others needed higher speed to thresh out all of the beans. Some of the varieties still had quite a bit of leaf and vine which made them more difficult to feed through the chipper, and others had minimal leaf and vine left and ran through very easily. Additionally some varieties hadn't matured as evenly and still had some green beans left.
 |
| From Seed Cleaning Equipment |
For most varieties there was quite a bit of large trash so we used a 1/2 inch wire mesh to scalp before winnowing. For the winnowing we used a simple floor fan and 10 gallon Rubbermaid totes. We also used a 6' x 8' tarp to catch material, and incase we had any spillage that we wanted to recover. We also used a larger 12'x24' tarp to keep the gravel clean and to make clean up in the end easier.
 |
| From Seed Cleaning Equipment |
Initial results showed yields between 2 and 5.5 pounds of beans per 50 row feet. The cost of production for 50 row feet worked out to roughly $20 from field preparation through winnowing. Final cleaning will add a few dollars bringing the cost of the beans to the neighborhood of $4-11 per pound. At least half the cost of production is in harvest and cleaning. The majority of the other cost is in hand hoeing, although this could be significantly reduced with tractor cultivation.
I'll post the varieties and notes soon. We have also been trialing some pole bean varieties in a three sisters style planting and those are still producing beans but I'll give a report on those when we process them, probably in November.
Wednesday, August 19, 2009
Heritage Wheat Seminar
It's the busy time of year in the fields but I thought I'd just put out a post for any New England farmers who might be interested in this weekend's (August 23-24, 2009) Heritage Wheat Seminar sponsored by NESARE. One day is in Vermont and the next in Maine, go to growseed.org for more details.
Thursday, January 15, 2009
Thoughts on Finding and Evaluating Seeds for Grain Production
Offered by Anthony Boutard
For those of us who are interested in unconventional grains and seed crops, it doesn’t take long to find that the characteristics of varieties are poorly documented and supplies are limited. We have no choice but to hunt down seeds, grow them out, and make good observations on growth and culinary qualities. This site can serve as a means of sharing information gleaned from that experimentation, to the extent growers and gardeners are willing to share.
For example, in my experience, the naked barleys have a weaker straw than wheat, oats or rye. They lodge, fall over as the grain ripens, making harvesting difficult. Over-dense planting exacerbates this problem. The plants hold up better when they can tiller extensively, so plant at a lower density. Older references add credence to this observation. In my limited experience, the two-row barleys have the weakest stems. Bear this in mind as you proceed.
As David Mader notes, grains purchased from food stores are often stale or dried at a heat that weakens or kills the germ, making them useless as a seed source. Local seed and supply companies offer grains, but they are run of the mill varieties. In addition, they represent a narrow range of culinary qualities. Often, they are treated with fungicides and insecticides, so take care if you are an organic farmer.
As you can see, we are left with few options. Here are some sources for small grains offered as a starting point. This is not a definitive list, and I hope people will add to it.
Kusa Seed Society: www.ancientcerealgrains.org
Kusa offers a good range of cereal grains in the form of several seed collections. They have one of the better sets of variety descriptions. They offer 18 varieties of naked barleys in three collections, two collections of wheat, as well as millet, hulled grain and lentil collections. Most of the varieties are offered at 100 grains per variety, but the hulled grains come in 25 ear packs – an ear has two grains. The grow-out process will be three to four years. I am planning to work with a couple of these collections each year. Kusa also offers literature on grains.
Sourcepoint Seeds, 26422 Moss Rock Road, Hotchkiss, CO 81419. Catalogue is $3.00, checks payable to Anpetu Oihankesni.
I have purchased naked barley seeds from Sourcepoint, specifically the varieties Dolma, Tibetian Purple and Glutinous. As with Kusa, quantities are limited, but I have had good germination and consistency of type. Anpetu, the owner, is very knowledgeable, and willing to share his observations. He carries a wide range of grain and seed crops.
Seed Savers Exchange: www.seedsavers.org
SSE has a good selection of grains available through its “Listed Members.” Typically offered in quantities of 25 seeds. The Yearbook provides cursory observations, but less detailed than Kusa’s.
Bountiful Gardens: www.bountifulgardens.org
Has a few grains and seed crops available.
Welter Seed and Honey Company: www.welterseed.com
Welter offers a range of wheat varieties and other grains such as triticale, and has certified organic grain available. Many are labeled VNI – variety not identified.
Johnny’s Selected Seeds. www.johnnyseeds.com
Johnny’s carries naked (hulless) oats and hard spring wheat in 50# sacks. They also have that standard (hulled) barley variety “Robust.” They appear to be out of stock at the present (January 2009).
Monday, December 15, 2008
Frikeh & Other Green Grains
(Here's another excellent post from Anthony Boutard. Some day I'll get him to upload his own articles, but as long as he keeps sharing such wonderful writing I'm not complaining.)
Frikeh & Other Green Grains
The core of this entry is cribbed from an article we wrote for Growing for Market a few years ago.
Most of us think of small grains in their mature, dry state, which allows them to be stored for many years. Less well known is the tradition of enjoying small grains in their immature (green) state as a perishable, seasonal delicacy. Throughout the Middle-east, from Egypt to Turkey, immature durum is processed into frikeh (frik, firik, freekeh). In southern Germany, Switzerland and Austria, immature spelt is roasted to produce grünkern. Across North Africa, heads of green barley are steamed and then threshed. There are similar traditions in the Ukraine and Georgia using bread wheat.
These green grains are more nutritious than mature grains, high in dietary fiber and low in phytic acid. The smoky, sweet and grassy quality of the grain adds a unique and new dimension to vegetarian dishes. I believe we are the only frikeh makers in the US. Most is imported from Syria, Jordan and Australia. The Australians have mechanized the process.
Harvest of the grain is done during the brief interval between the “milk stage,” when endosperm is still liquid and sweet, and the “soft dough” stage, when the endosperm is solidifying and developing its starches. Too early and the grains shrivel; too late and the grains are no longer sweet and green. The right moment is when a kernel is pinched and yields only a tiny drop of “milk.” The window for high quality frikeh production is about four days.
We cut the wheat with a sickle bar mower and the sheaves are stacked on the corrugated metal sleds with their heads lined up in a row. The heads are then roasted with a large propane burner. The goal is to burn off the awns and scorch the chaff that surrounds the grain. The fire imparts a smoky flavor to the grain, and the heating stops the maturation of the endosperm and stops the degradation of the chlorophyll. The ideal frikeh grain is green with just the tip charred.
Next year, we hope to modify a hedge trimmer so we can harvest just the heads. The less straw we handle, the easier the task. We are also thinking it might be possible to do the parching in a pepper roaster.
The next step is to thresh and winnow the grain. Scorched durum is very easy to thresh and it can be done by hand, at least for home use, if not commercially. All of our test runs were burned with a plumber’s torch and threshed between our hands. Depending upon other tasks at hand, a farmer can probably hand process 200 LB of frikeh in a couple of days, enough to add some zip to a CSA box. It might be tedious alone, but a fun project for interested subscribers.
For small batches of seed grain, we use a screen made from 1x4 boards and 4x4 hardware cloth. Rubbing the heads of grain on the screen allows us to thresh small lots faster than messing around with a thresher. This should work fine for frikeh. We use a larger stationary thresher for the task. A small combine that allows hand feeding would also work. Be forewarned, it is a sooty business, and you end the day looking like one of Dorthea Lange’s coal miners.
 |
| From Anthony's Grains |
Our first year, we hand winnowed all of the grain. We now produce over a 1,000 LB per year, and use a Clipper seed cleaner. You will need to clean the grain twice, once after threshing and then later when the grain is dry. The grain is at its very best fresh, but in that moist and sweet condition it is more perishable than berries or peaches. Drying allows the farmer to sell it at a measured pace, which is how we sell most of our frikeh.
Drying is the most perilous part of the process. In our first year, we dumped hundreds of pounds of grain destroyed by molds and yeasts. We learned a couple of things from the experience. First, clean the grain immediately, you don’t want anything that can hold or trap moisture. Second, tarps are not a good surface for drying grains. The grain must dried on screens, otherwise it will mold very quickly.
We use two-foot wide 8x8 hardware cloth for the screens. The frames are made from 1x4 boards. We have both four and eight foot long trays. The longer trays must have a divider in the middle. We have found both sizes work well. The longer trays are easier to move with a forklift. These trays are great for all sorts of odds and ends, such drying beans, garlic and peppers, as well as storing sweet potato tubers for slips.
When fresh, we put a thin layer of grain in each tray, consolidating the trays as the grain dries. The trays are stacked five or eight high atop a sawhorse and stickered with furring strips. A sheet of corrugated roof panel sits on top to keep the birds and squirrels at bay. Situate the trays in a barn or on a porch where there is good airflow. Better yet, move them outdoors during the day, keeping a corrugated sheet on top.
During the first few days of drying, especially, it pays to be obsessive about the process. We set up an empty screen on the horses and pour the grain out of the tray that it sat in overnight into the fresh screen. This is the best way to shake up the grain, and assure that it is drying evenly
The finished grain is rinsed a couple of times and cooked for 45 minutes to several hours. It holds up well to extended cooking. Frikeh is traditionally served with lamb or chicken. Tradition aside, the grain may be used in any recipe that uses rice or bulgur wheat. It is extremely versatile and wonderful with all summer vegetables. We cook up big pots of the grain and use it over several meals. It can be used in soups, salads, raitas and pilafs.
A longtime champion of frikeh, Paula Wolfert provides a recipe or two in each of her various middle-eastern cookbooks.
For three years, we parched spelt for grünkern. It is delicious, and a completely different flavor from the durum. Unfortunately, it was too time consuming to clean. The tip of the spelt head has a sharp tip that detaches and is inedible. The tip is almost the same size as grain of spelt, and was not removed by the seed cleaner. Lots of hand work. If you have a gravity table kicking around, it might be worth a try. There were a many sad faces when we dropped the grünkern.
References:
Musselman, L. J. and A. B. Mouslem. 2001. Frikeh, roasted green wheat. Economic Botany 55(2): 187-189. See http://www.odu.edu/webroot/instr/sci/plant.nsf/pages/frikeh
Wolfert, Paula. 1998. Mediterranean Greens and Grains. NY: HarperCollins. 368p.
Wolfert, Paula. 1994. The Cooking of the Eastern Mediterranean. NY: HarperCollins.
Wolfert, Paula. 1994. Mediterranean Cooking. NY: HarperPerennial. 320p.
Subscribe to:
Posts (Atom)
